
*Easy to make
*Fast to make
*Easy to store
*Cheap (postage is a killer if you live in Australia, necessitating mostly DIY terrain)
*Looks unified (i.e. complete table 'goes' together, no 40K gothic ruins and WW2 buildings together)
I don't pretend to be a great modeller, so "looks good" and "lots of detail" doesn't really rate on the scale. If you're a painstaking modeller who likes model-railroad level detail, there are plenty of great blogs out there, by very talented people. This is about terrain for the rest of us - the low skilled, time poor dads. I don't want to make a single building in an afternoon, I want to make the whole table.

My daughter can cover an entire lounge room floor with her blocks (aka landmines for bare feet) - so surely mine could fill a 4x4' table?
I've tried a few things so far:Card terrain ($50 for 4x4') usually can't be re-folded which means there is no space savings.
Terraclips ($70 for 4x4') do break down well, but then they take forever to assemble.
Foam terrain ($7 for 4x4') is very cheap, but bulky to store. It's easy to fix/replace though.
MDF terrain ($200+ for 4x4') looks good, but is difficult to store and is surprisingly pricey
Forests ($18 for 4x4') are bulky to store, unless you spend lots of time making special bases.
Foamboard buildings ($70 for 4x4') is easy to work with, but very bulky to store
Resin is not even remotely affordable in Australia (postage is ridiculous for anything beyond 6mm scale)

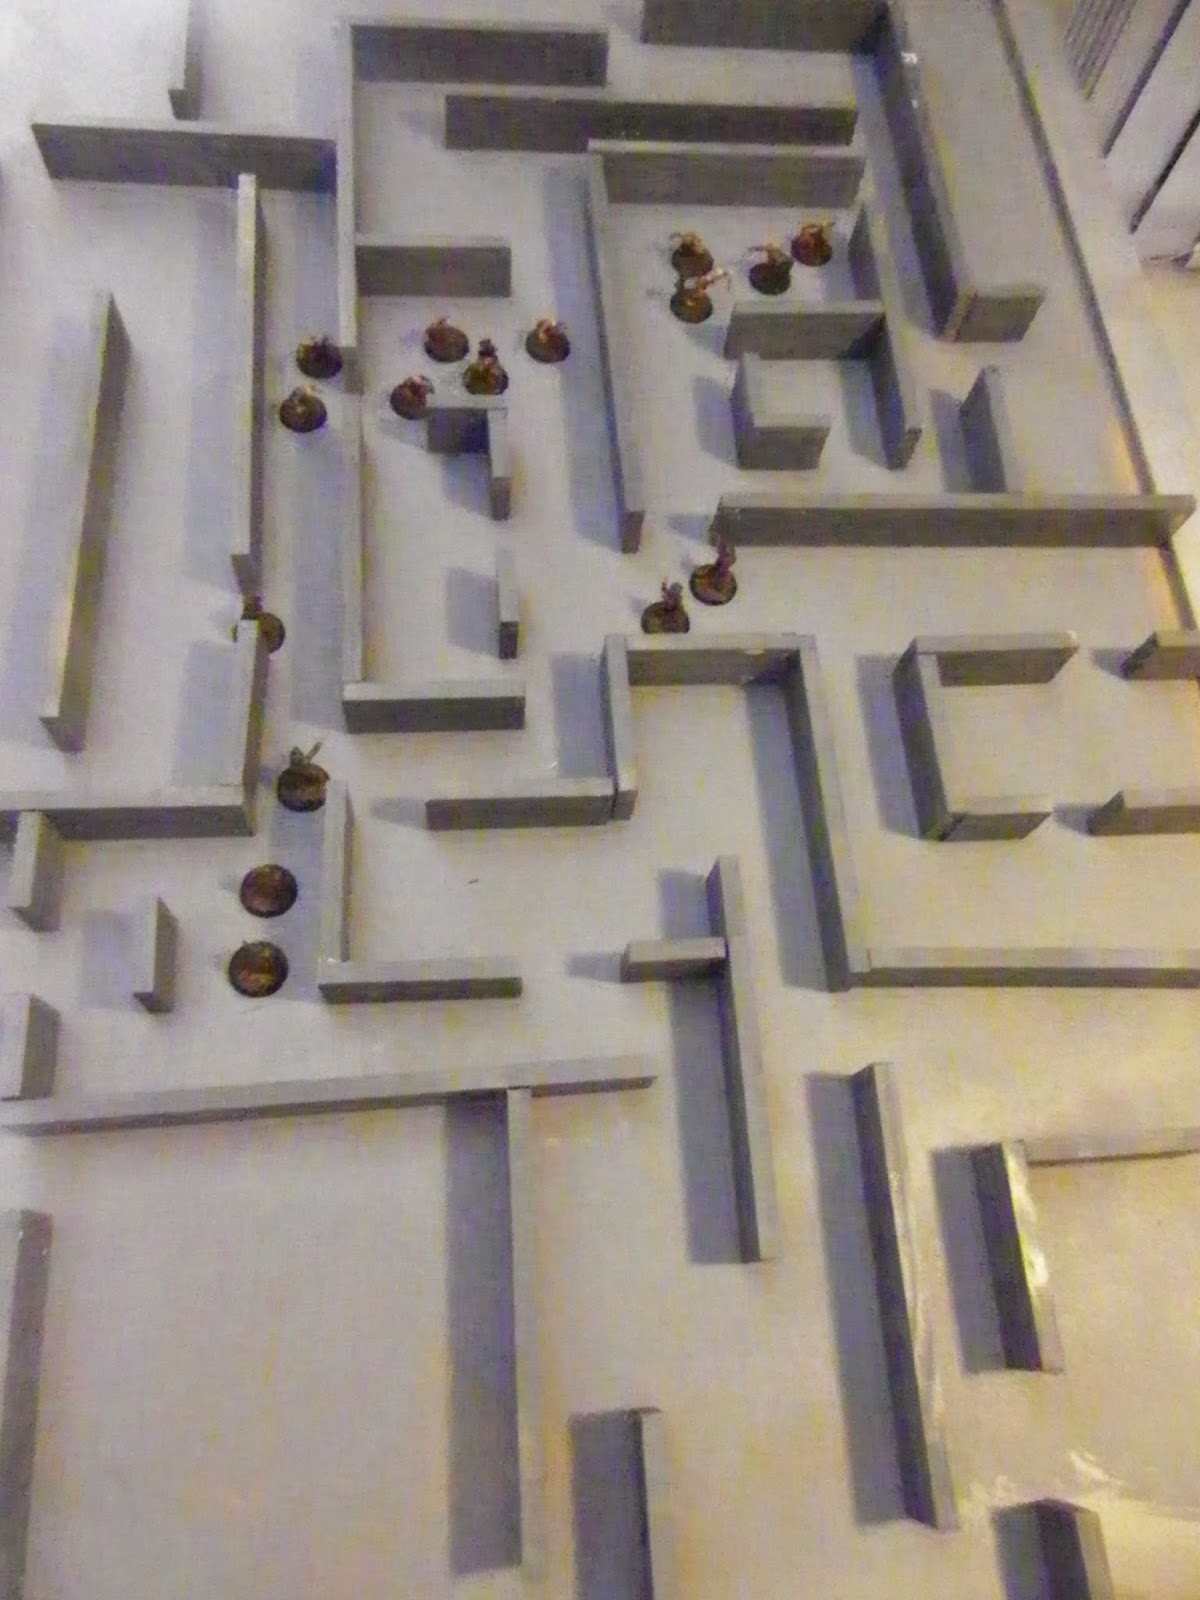
The entire box stores in an area about the size of a single terrain feature or building....
The idea
After tidying up my daughter's blocks, I was surprised how much a single box of blocks spread around. Given the high cost of laser-cut MDF, I wondered what I could do with my humble bench saw. My only criteria: I had to be able to fit it in a small A4-size box, and quickly set it up.
As luck would have it, I had some leftover 42x11mm pine strips from lining my shed. Two hours later, I had 16 x 5cm, 16 x 10cm, 16 x 20cm, and 8 x 30cm walls, hastily sprayed a neutral grey (to serve as both spaceships and dungeons/castles/bunker complexes).
Equipment: 2 x 2.7m 42x11mm pine strips $10, 1 x grey primer spray can $3 = $13 total
Time: 2 hours
In hindsight, I'd have made less 20cm and 30cm lengths, and more 5cm and 10cm lengths. The shorter walls are far more versatile.
Obviously this could be dressed up a lot by interior detail. I've got a few ideas for doors I'd like to try.
There are some cool Hirst Arts molds with interesting interior bits and bobs. I've got some furniture from Antenociti's workshop which will also jazz it up.
The free-standing walls are relatively stable, and resist the occasional jostle and bump, but might not be ideal in a high traffic situation.

I also found I needed more smaller (5cm and 10cm) pieces and struggled to find a use for all the longer 30cm pieces. I'll probably make at least 8 more of each of the smaller ones.
Finally, whilst I used 42mm x 11mm pine (as that's what I had at hand), in hindsight I'd probably go 50mm+ for taller walls - simply to make sure larger models don't destroy immersion by peeking over the top.

It's very plain, but the 3D nature still makes it better than say, D&D or Space Hulk tiles. Some interior details (desks, beds, control panels, doors) should dress it up a bit.
It's a fair result for the minimal time/cost involved.
It was so fast to make, I may start another project this weekend - which is to make a table that allows sunken features (trenches, rivers, ravines, canals, lava pits) whilst remaining cheap and easy to make.
Excellent idea, I'll have to look for kids' wooden blocks around here. I have a similar situation in terms of high shipping costs in Brazil, only with terrible exchange rates to make them worse. I have tried flat-folding paper terrain but I agree, re-assembly can take a lot of time, so I end up not using it as often as I thought I would.
ReplyDeleteYou don't have access to a power saw? It was super fast to cut them, and allows you to cut them in precisely the lengths/sizes you want.
DeleteThat said, with blocks you might get some good archways that are difficult to cut yourself.
I'll probably also grab some dowel rod for cylindrical temple/tomb pillars.
I was thinking about using the blocks as small cover elements and such, especially for 15mm minis.
DeleteLove it - Incursion is still one of my fav games too!
ReplyDeleteActually it was finding my Incursion box set this morning that got the whole "underground bunker" train of thought going....
DeleteThat's a great start. It shouldn't take long to paint some detailing on those walls, too. A couple access panels, maybe some colored horizontal stripes, a few signs showing direction. That would make it look more like an active station and less like an abandoned concrete bunker.
ReplyDeleteI'm leaving them blank so I can toss them in a box and quickly lay them out, like true kids blocks.
DeleteHowever I AM contemplating another set, painted with aluminium silver paint. Perhaps if I ran the coloured stripes down the exact centre of the blocks....
Another advantage of leaving them just plain gray is that they can work for various different genres like this (Fantasy Dungeon, WWI trenches, 1890's Pyramid robbing, Sci-Fi boarding action, etc), whereas once you paint details or stick on little paper signs it's pretty definite what genre it works for.
DeleteYou could of course only decorate some of them and leave the rest plain. If 1/3 of those had various details added it would probably be enough to add a bit of visual interest, while leaving the other 2/3 usable for other genres.
Another thing I've seen used before on similar terrain (though I think they where using Hirst Arts molds), is putting sheets of paper over the top for hidden deployment. From memory it was a more RPG like SoBH game: One player set up a maze and a bunch of monsters, and then covered it with paper. The other player's had either a single powerful model, or a small warband each
Yes - generic, cheap, quick and easy.
DeleteI'm going to add detail using removable objects - like doors - i.e. wooden door vs airlock - and movable furniture - beds, weapon racks, control panels, etc.
Adding that in will increase the time/cost vastly though.
It works OK as is - and given the negligible time and cost spent is a perfectly playable table with a unified theme.